Hello, darlings! Victoria here, your guide to creating soulful spaces and delectable treats. Today, we’re embarking on a culinary journey to craft something truly special: Easy Mini Fruit Tarts. These aren’t just desserts; they’re tiny edible works of art, perfect for adding a touch of elegance to any gathering or simply brightening your day. Imagine the delicate sweetness of fresh fruit nestled atop a creamy filling, all cradled in a buttery, melt-in-your-mouth crust. It’s a symphony of flavors and textures, a miniature masterpiece that’s surprisingly simple to create. Let’s transform your kitchen into a haven of creativity and bake these delightful mini fruit tarts together. These are also a great alternative to mini fruit pizzas!
Why You’ll Love This Mini Fruit Tart Recipe
There’s something utterly charming about mini desserts. They’re perfectly portioned, visually appealing, and incredibly versatile. But beyond their aesthetic appeal, these mini fruit tarts offer so much more:
- Effortless Elegance: They look like they took hours to create, but the truth is, they’re surprisingly easy to make, even for beginner bakers.
- A Burst of Freshness: The combination of sweet cream cheese filling and vibrant fresh fruit is simply irresistible. It’s like capturing the essence of summer in every bite.
- Perfect for Any Occasion: From casual picnics to elegant dinner parties, these mini fruit tarts are always a crowd-pleaser. They’re also a wonderful option for birthdays, holidays, or any time you want to add a touch of sweetness to your day.
- Customizable: Feel free to get creative with your fruit selection and filling flavors. The possibilities are endless!
- The sugar cookie crust is buttery and soft, providing the perfect base for the creamy filling and fresh fruit.
I find that when I have to make the dessert for a party, these mini fruit tarts are always a winner. They’re easy to grab and go, and they look beautiful on a dessert table. Plus, who can resist a bite-sized treat?
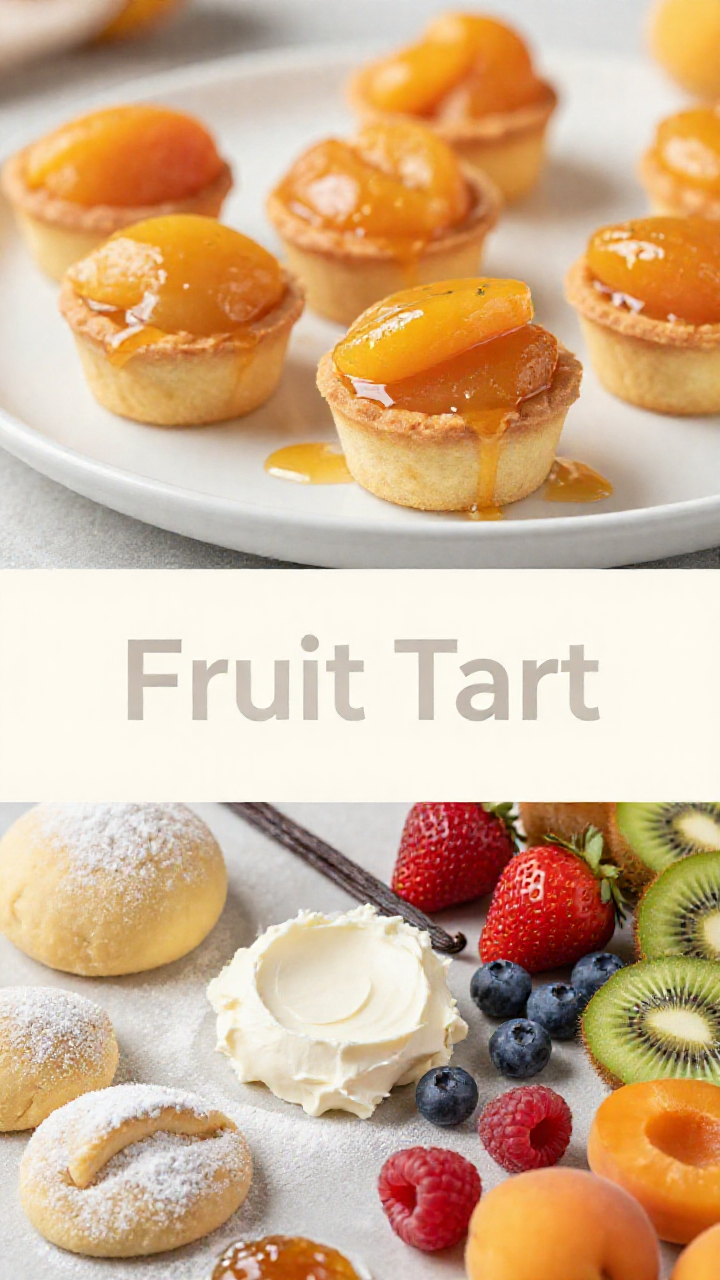
Ingredients for Mini Fruit Tarts
Here’s what you’ll need to create these delightful mini fruit tarts:
- 1 package (14.1 oz) refrigerated sugar cookie dough
- 8 oz cream cheese, softened
- 1/2 cup powdered sugar
- 1 teaspoon vanilla extract
- Assorted fresh fruit (strawberries, blueberries, kiwi, raspberries, etc.)
- Apricot jam or jelly, for glaze (optional)

How To Make Mini Fruit Tarts: Step-by-Step Guide
Now, let’s dive into the step-by-step instructions. Don’t worry, it’s easier than you think!
- Prepare the Oven: Preheat your oven to 350°F (175°C). This ensures even baking for perfectly golden crusts.
- Slice the Dough: Slice the sugar cookie dough into approximately 1/4-inch thick rounds. These will form the base of our mini fruit tarts.
- Shape the Crusts: Press each cookie dough round into the bottom and up the sides of a mini muffin tin. Gently mold the dough to create a neat, even cup shape.
- Bake the Crusts: Bake for 8-10 minutes, or until lightly golden brown. Keep a close eye on them to prevent burning. Let cool completely in the muffin tin.
- Prepare the Filling: While the crusts are cooling, prepare the cream cheese filling: In a bowl, beat together the softened cream cheese, powdered sugar, and vanilla extract until smooth and creamy.
- Remove the Crusts: Once the crusts are completely cool, carefully remove them from the muffin tin. A small offset spatula can be helpful for this step.
- Fill the Tarts: Fill each tart crust with a spoonful of the cream cheese filling. Don’t overfill, as you’ll need space for the fruit.
- Arrange the Fruit: Arrange assorted fresh fruit on top of the cream cheese filling. Get creative with your designs!
- Glaze (Optional): If desired, melt apricot jam or jelly and brush over the fruit for a glaze. This adds a beautiful shine and enhances the flavor.
And there you have it! Beautiful, delicious mini fruit tarts, ready to be enjoyed.
Pro Tips for Perfect Mini Fruit Tarts
To ensure your mini fruit tarts are absolutely perfect, here are a few of my favorite pro tips:
- Soften the Cream Cheese: This is crucial for a smooth, lump-free filling. Let the cream cheese sit at room temperature for at least 30 minutes before using.
- Don’t Overbake the Crusts: Overbaking will result in hard, dry crusts. Keep a close eye on them and remove them from the oven as soon as they’re lightly golden brown.
- Cool Completely: Make sure the crusts are completely cool before filling them. Otherwise, the filling will melt.
- Use a Piping Bag: For a more polished look, pipe the cream cheese filling into the crusts using a piping bag fitted with a decorative tip.
- Cut Fruit Evenly: For a visually appealing presentation, cut the fruit into uniform sizes and shapes.
- Brush with Glaze: The glaze not only adds shine but also helps to preserve the fruit and prevent it from drying out.
Remember, the key to successful baking is patience and attention to detail. Don’t rush the process, and enjoy the creative journey!
Common Mistakes to Avoid
Even the most experienced bakers can make mistakes. Here are a few common pitfalls to avoid when making mini fruit tarts:
- Using Cold Cream Cheese: This will result in a lumpy filling.
- Overbaking the Crusts: This will make them hard and dry.
- Filling Warm Crusts: This will cause the filling to melt.
- Using Too Much Filling: This will make the tarts difficult to handle.
- Not Glazing the Fruit: This will cause the fruit to dry out and lose its shine.
By being aware of these potential pitfalls, you can avoid them and create perfect mini fruit tarts every time.
Variations on the Classic Mini Fruit Tart
One of the best things about this recipe is its versatility. Here are a few variations to inspire your creativity:
- Different Crusts: Instead of sugar cookie dough, try using shortbread cookie dough or even graham cracker crumbs for a different texture and flavor.
- Flavored Filling: Add a touch of lemon zest, orange zest, or almond extract to the cream cheese filling for a unique twist.
- Chocolate Drizzle: Drizzle melted chocolate over the finished tarts for a decadent treat.
- Different Fruits: Experiment with different combinations of fresh fruit, such as mango, pineapple, or star fruit.
- Berry Medley: Create a berry medley with strawberries, blueberries, raspberries, and blackberries for a burst of antioxidants.
- Individual Fruit Tarts: Make larger, individual fruit tarts using a tart pan instead of a mini muffin tin.
- No Bake Option: You can even make a no-bake version of these tarts by using pre-made graham cracker crusts and a no-bake cheesecake filling.
The possibilities are endless! Feel free to experiment and create your own signature mini fruit tart recipe.
How to Store Mini Fruit Tarts
To keep your mini fruit tarts fresh and delicious, follow these storage tips:
- Refrigerate: Store the tarts in an airtight container in the refrigerator.
- Consume Within 2-3 Days: For the best flavor and texture, consume the tarts within 2-3 days.
- Don’t Freeze: Freezing is not recommended, as it can affect the texture of the crust and filling.
If you’re making the tarts ahead of time, you can prepare the crusts and filling separately and assemble them just before serving.
Frequently Asked Questions (FAQ)
- Can I use frozen fruit?: While fresh fruit is preferred, you can use frozen fruit in a pinch. Just make sure to thaw it completely and pat it dry before using.
- Can I make the crusts ahead of time?: Yes, you can bake the crusts ahead of time and store them in an airtight container at room temperature for up to 2 days.
- Can I use a different type of cookie dough?: Yes, you can use any type of cookie dough you like, such as shortbread or chocolate chip.
- Can I make these tarts vegan?: Yes, you can make these tarts vegan by using vegan cookie dough, vegan cream cheese, and a plant-based glaze.
- How do I prevent the crusts from sticking to the muffin tin?: Make sure to grease the muffin tin thoroughly before pressing in the cookie dough.
Serving Suggestions for Mini Fruit Tarts
These mini fruit tarts are perfect on their own, but here are a few serving suggestions to elevate your experience:
- With Coffee or Tea: Serve them with a cup of coffee or tea for a delightful afternoon treat.
- As Part of a Dessert Platter: Include them on a dessert platter with other mini desserts, such as brownies, cookies, and cupcakes.
- With a Scoop of Ice Cream: Top each tart with a scoop of vanilla ice cream for a decadent dessert.
- With a Glass of Sparkling Wine: Pair them with a glass of sparkling wine for a celebratory occasion.
No matter how you choose to serve them, these mini fruit tarts are sure to impress. They are a wonderful option for mini fruit desserts for parties!
Final Thoughts
And there you have it, my dears! A simple yet elegant recipe for Easy Mini Fruit Tarts that’s sure to bring joy to any occasion. Remember, creating a beautiful home and a beautiful life is all about embracing the simple pleasures and adding a touch of artistry to everything you do. So go ahead, gather your ingredients, and let’s create something truly special together. Happy baking!

Mini Fruit Tart Recipe
Ingredients
Method
- Preheat oven to 350°F (175°C).
- Slice cookie dough into 1/4-inch thick rounds.
- Press dough into mini muffin tin.
- Bake for 8-10 minutes, until golden brown. Cool completely.
- Prepare cream cheese filling: beat cream cheese, sugar, and vanilla until smooth.
- Remove crusts from muffin tin.
- Fill each tart with cream cheese filling.
- Arrange fruit on top.
- Brush with melted jam or jelly (optional).
Notes